


Have you created beautiful store pages and crafted selling meta tags and product descriptions for your Shopify store?
It is high time to submit your store sitemap to Google Search Console (formerly, Google Webmaster).
Read this post up to the end, and you will know for sure how to do it right.
Why use Google Search Console?
By sending the Shopify sitemap to Google Search Console, you make it easier for search engines to detect and index your store content. Simply put, you explain to search engines where they can go from the home page of your Shopify store.
Unfortunately, Google won’t crawl and index every single page. So, you should ensure that search engines focus on your most valuable categories, products, and blog articles by making your Shopify store Google-friendly. For this, you can either study official guidelines or turn to SEO experts that will take care of all the technical stuff.
Also, keep in mind that Shopify store indexing requires some time, especially if you have launched your store recently. So, don’t panic if everything doesn’t happen at once.
How to tell Google about your Shopify store?
Overall, the crawling and indexing process looks like this:
- You locate your Shopify store sitemap.
- You submit your store domain and sitemap to Google Search Console.
- You verify that you are the owner of the domain and the given Shopify store.
- Google crawls your website and understands its content.
- In 3-4 days after submitting, you can see what content got indexed.
- You can start tracking and analyzing the keywords, clicks, impressions, and SEO issues for your Shopify store.
Step 1. Get your Shopify sitemap
Shopify automatically creates sitemap.xml files for its stores. It includes links to all the store pages featuring products, collections, and content. Google, Bing, and other search engines use this information to index websites and show them to relevant people in search results.To locate your Shopify sitemap, go to the root directory of your store’s primary domain name. For instance, this can be https://welldoneby.com/blog/sitemap.xml.
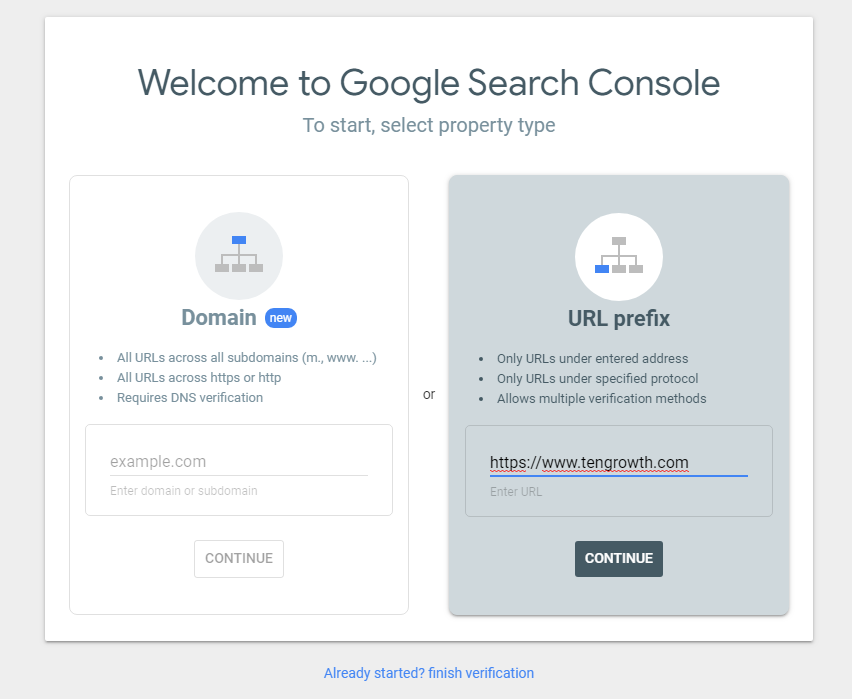
Step 2. Add your store to Google Search Console
First, go to Google Search Console (formerly Google Webmasters) and choose your property type. The first option should be used if you own a third-party domain and didn’t transfer it to Shopify. If you have a standard .myshopify.com domain or a more appealing custom domain, click on the URL prefix option and type in your Shopify domain including the SSL certificate. After clicking Continue, you will be given several ways to verify that you are the owner of this Shopify store.
Step 3. Verify the ownership of your Shopify store
Though Google suggests the HTML file verification as the default option, you can also choose another method if it is more appropriate for you. For example, you can use your Google Analytics account or Google Tag Manager account if you have one, associate a DNS record with Google, or submit an HTML meta tag to your Shopify store home page.
You can use several methods at once to ensure that you won’t lose your verification. For now, let’s pick the HTML Tag verification as it is one of the most straightforward methods and, actually, the one that Shopify suggests in their guidelines.
After you pick this method, Google will generate a meta tag for you. Copy this piece of HTML code and follow the steps below:
- Go to your Shopify admin.
- Open the Online Store tab and locate your current live theme (Google won’t index other themes).

- Click on the theme.liquid in the Layout section.
- Paste the HTML code you copied a couple of minutes ago below the <head> tag.
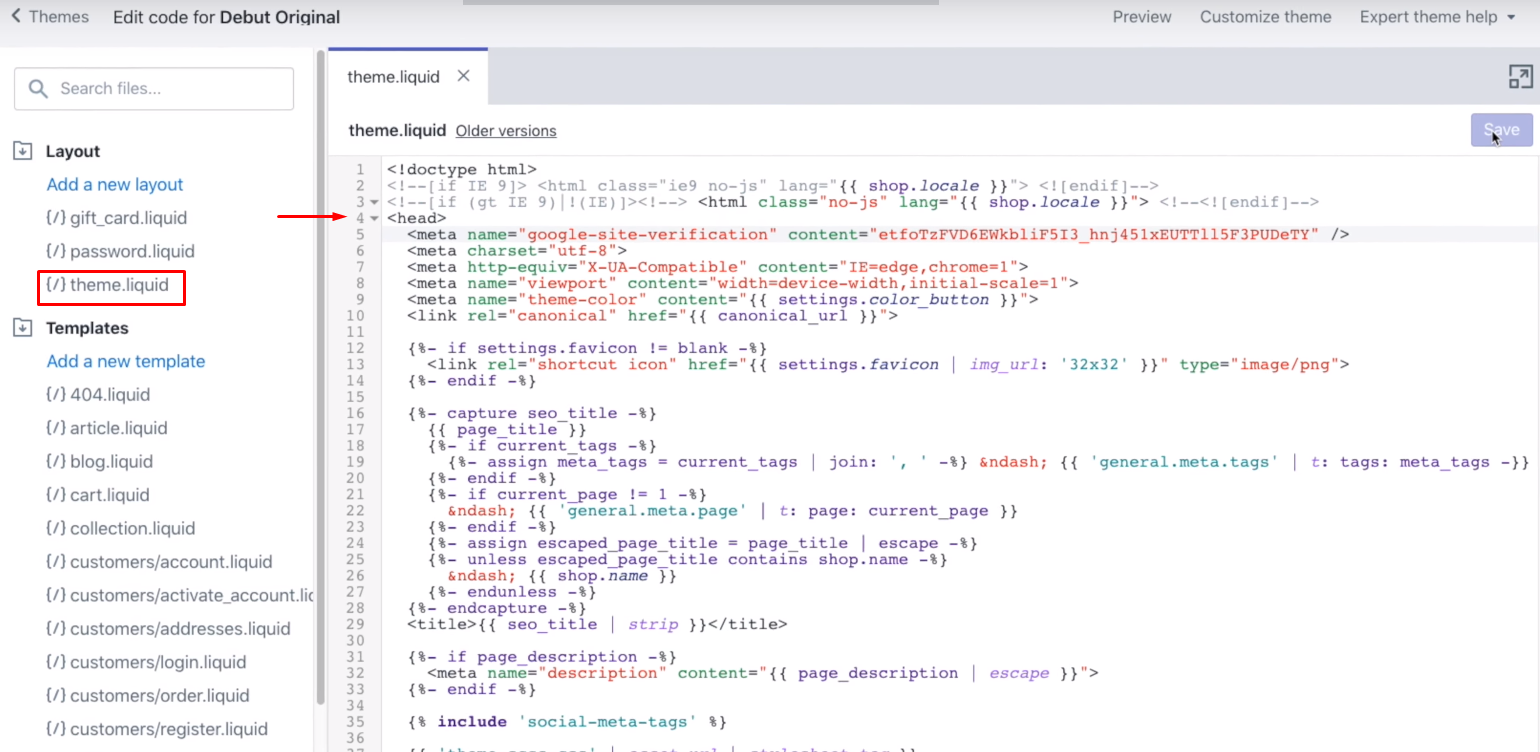
- Save, go back to Google Search Console, and click the Verify button. The page should load.
- Wait for the following popup to notify you about the verification success.
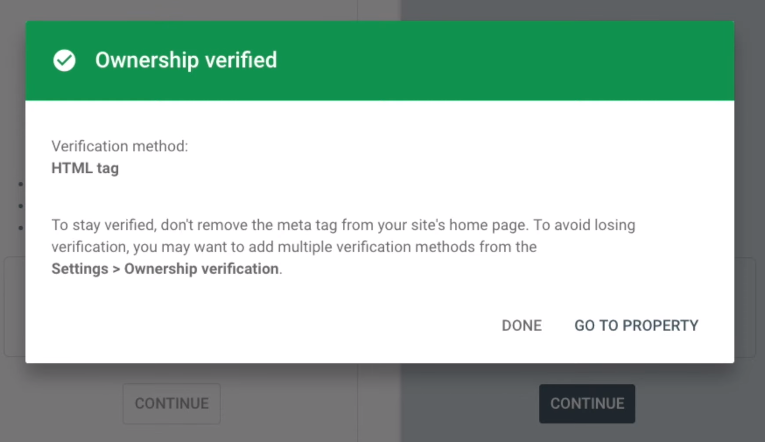
- Choose the Go to Property option on the popup to load Google Search Console.
Remember that Google uses your current theme to index the store. So, if you switch to another Shopify theme or accidentally delete the HTML tag you’ve just used for verification, you will have to complete all the above steps once again. To be on the safe side, add another verification method, by clicking on Add Property in Google Search Console and following the Google guidelines.
Step 4. Submit the sitemap of your Shopify store
Now you are just a few clicks from successfully telling Google about your Shopify store. Open your Google Search Console and Find the option Sitemaps in the left-hand menu. After you choose the Add a new sitemap option, you can paste the URL of your Shopify sitemap (Step 0) in the text box provided. After clicking Submit, you will see a success popup.
In the status column, you will see either the success or the error status. Click on the error to learn how to fix it. In most cases, you will have to delete and then reupload the sitemap to fix the issue.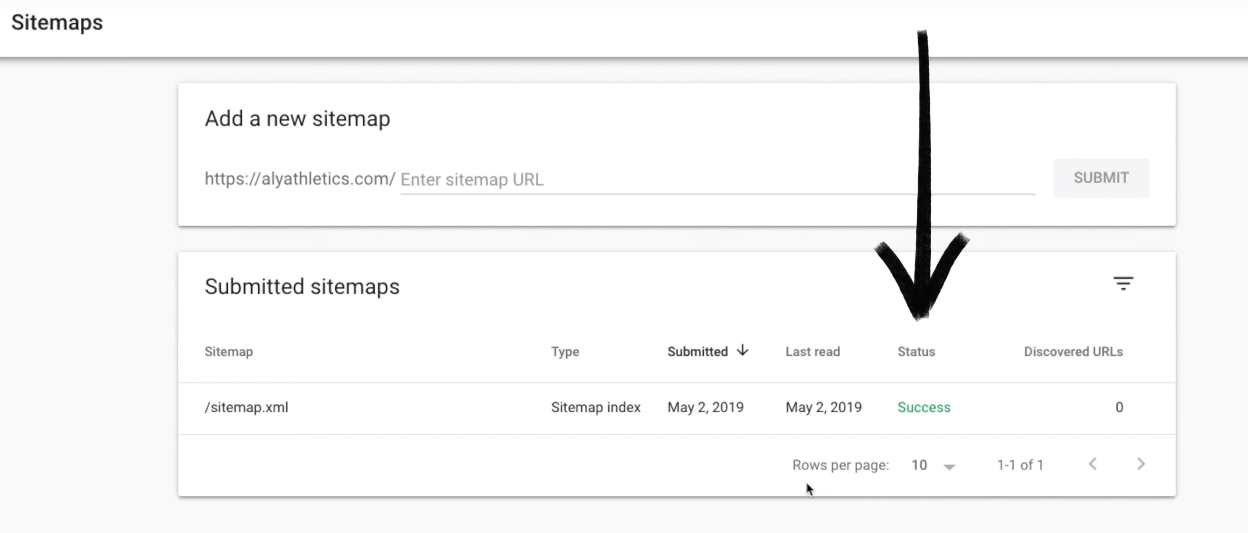
What is your reward?
Though Google will crawl and index your Shopify store even if you don’t sign up with Google Search Console, this is still an essential step. Why so?
As a result, you will:
- Understand how Google sees your store.
- Get more insights into how to enhance your web presence.
- Access traffic data for your Shopify store.
- Learn about your SEO performance (including backlinks, Google’s issue and spam alerts, the search queries stats, and so on).