


Shopify is the most popular ecommerce platform, well-known all over the world. Shopify uses a SaaS model and provides its users with a set of services for successful sales (you can try them for free for 14 days).
What does Shopify offer?
Shopify allows companies and individual merchants to create a modern and manageable website for selling their products to a large number of customers from different countries. Shopify has tools for monitoring shipping and tracking remaining goods. With its clear and understandable administration panel, website owners can manage their products in any quantity, write descriptions, handle orders — in short, do whatever is necessary for their business.
If you after 14 days you like Shopify as many (including us) do, you will have to choose one of the proposed plans and the way of payment. It’s important to mention here know that one-time payment per year is more economical than monthly payments.
We prepared a special guide for beginners with the most popular questions about Shopify pricing, which you can find here. Also, check a detailed analysis of Shopify functionality and its comparison with other ecommerce platforms in our previous post.
In short, Shopify is the best solution for beginners and those who don’t want to hire developers or spend a lot of time creating the website but want to get a competitive, nice-looking, and fully-functional store. So, if you recognize yourself in that description, it is time to create your own Shopify store!
6 steps on the way to creating a Shopify store
It is great that it takes just several minutes and clicks to launch a Shopify store. You don’t even need special knowledge and programming skills. Let’s take a closer look at what exactly you should do.
Sign Up
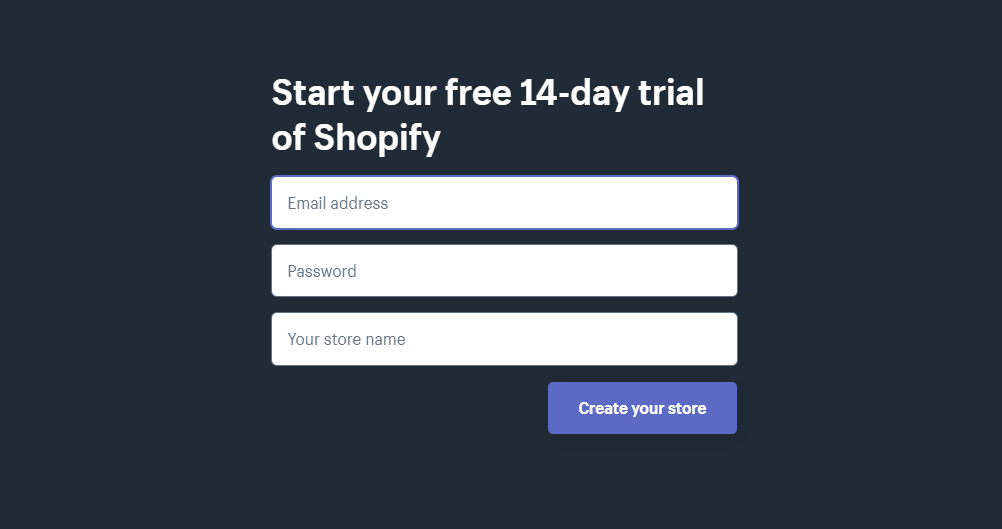
Creating your store begins with signing up with Shopify. Open the Shopify website and push the Start free trial button. When you see three clear fields, you should write your email address, password, your store name, and click the Create your store button.
Notice, your store name should be unique. If it duplicates the existing store, you won’t get the domain name.
In the next form, point out some information about yourself, choosing one of the answers to the questions: Are you already selling? What is your current revenue? Then choose between the creation of a brick-and-mortar store and an online store. In our guide, we chose the online store.
Click the Next button and provide your personal information, such as name, address, country, and phone number. The system will customize currencies and tax rates according to this data. Then push the Enter my store button to go to the next step.
Add products
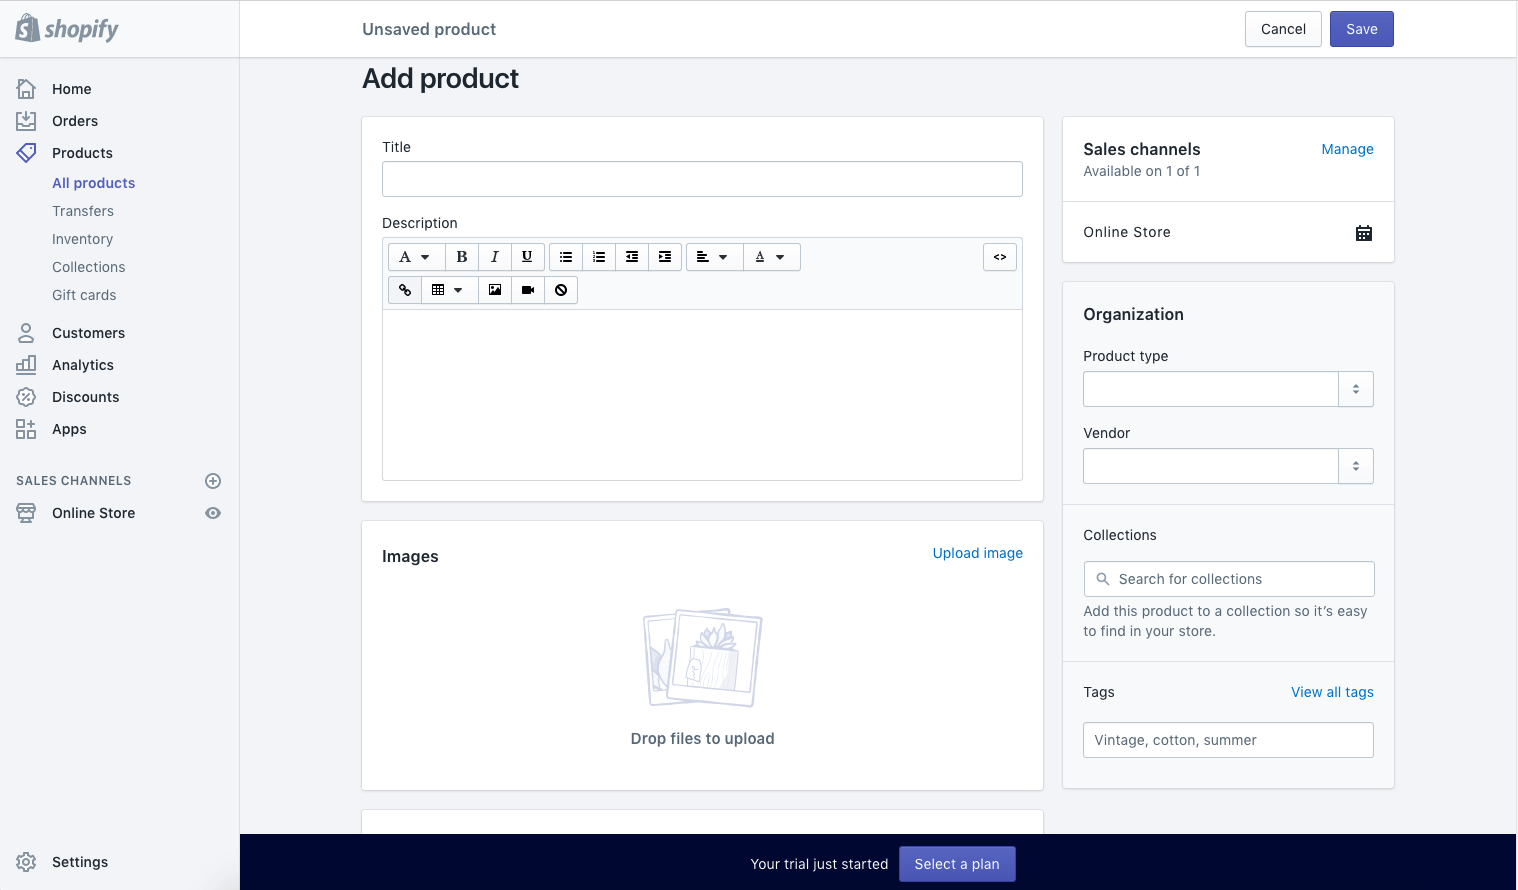
Now you see the administration panel of your site and the first thing that you should do is to add the products for your target market.
You, as the store owner, can give information about the name of the product, its description, brand, and price. Don’t forget to save changes after you finish the writing.
Think about the quality of your information and ways to attract the attention of your clients, so, choose good images of your products and write useful descriptions.
With Shopify, you can set the collections or groups of the products the way you need. For example, if you sell clothes, you can create separate pages for the women, men, and children stuff.
It is very useful that you can show the same products in different collections at once; for instance, in Accessories and Women’s Clothes. Such a setting will help your customers to find needed things and increase your sales.
Choose the design of your store
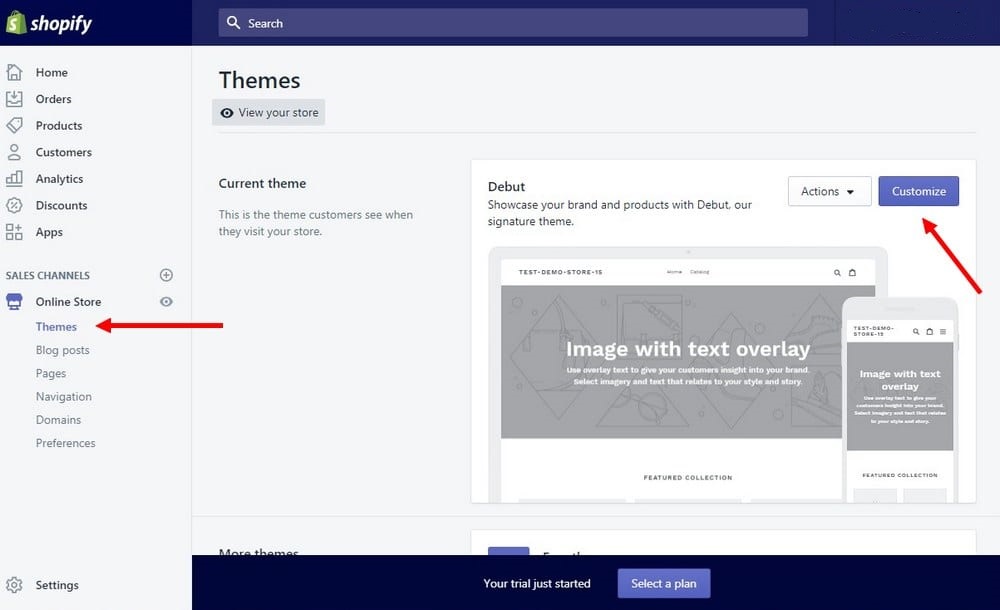
At the main page of your administration panel is Customize the Look of Your Site button. When you click it, you can configure how your website looks like, its colors and logo. Also, you can use Visit the Theme Store button to find a huge number of various themes for your website. Use the Preview in new window button to see how your store will look in the chosen design.
You can choose both free themes that are more simple and premium themes with additional features that will make your store truly impressive. If you need it, you can turn to dedicated developers to make modifications with the help of CSS and HTML.
They can customize:
- Color schemes
- Fonts
- Logos
- Items appearance on the page
- Items functionality
- Carousel sliders
Also, you can get assistance with creating the content for your website, writing the descriptions, customizing themes, marketing, SEO, etc.
Configure domain
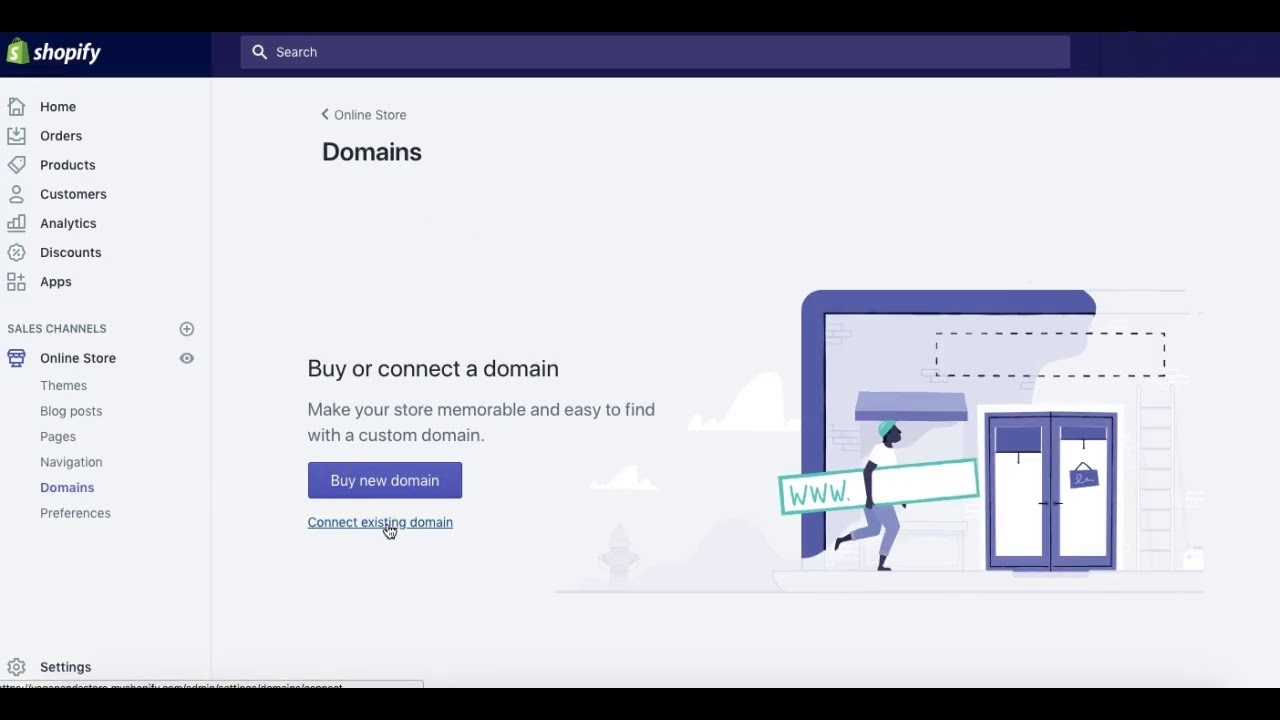
Your website is almost ready, but it won’t work without a domain. Find Add a Domain button at the administration panel to register a new domain or transfer an already existing one. As you are a beginner and haven’t a domain, you should buy the domain for your store.
There are two ways: you can buy the domain and add it directly at your store or you can buy it in another place and after that link it to your website. Notice, you need to update DNS settings if you want to use an already existing name.
After the activation of the domain, you can open your site as a customer.
Check the information
Before starting to sell, be sure that you have provided all the information below:
- General: all required data, including legal and billing details, are pointed in special fields.
- Taxes: the field near the Charge taxes setting should be activated for your accounting purposes.
- Shipping: you can turn on the Requires shipping button near the products that entail paid delivery. Choose the needed setting that will help you to increase your sales.
In the administration panel, you can test your order system before opening the store. Click on Settings and go to the Payments setting, where turn on the Payments area and choose the credit card gateway to test. After this configuration, you can push the Bogus Gateway button to make an order as a customer.
Turn on Payment Processor
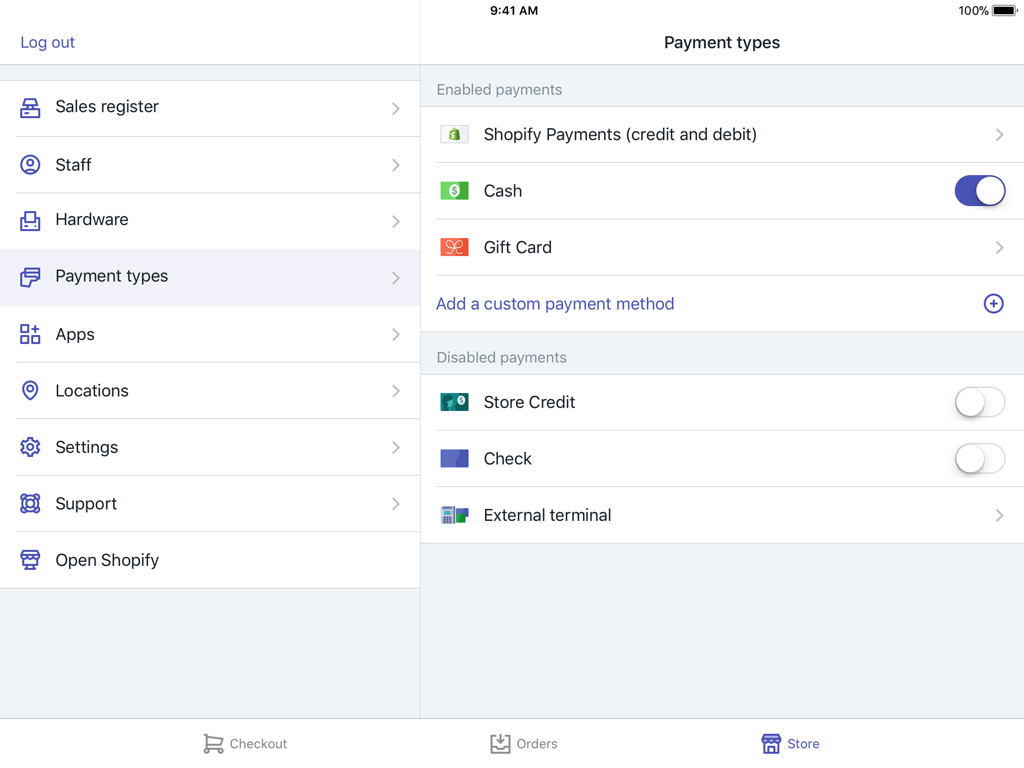
With Shopify, you can use one of the various payment processors, such as Stripe or Authorize.net, or a simple Shopify payment processor to accept payments. Click the Payments button on the administration panel to customize your payment processor.
When you are choosing the payment gateway, you should take into account several important things below because it is one of the most serious settings in your store creating:
- Transaction fees. How does it work? Generally, payment gateways take some percentage every time when customers purchase something on your website. Find the payment gateway with the lowest fee.
- Card types. It is necessary that your payment gateway can work with different cards and types of payment, including popular Stripe and PayPal.
- Off-site checkout. It means that the payment process takes place on the payment gateway server. It is a safe way of payment but not so convenient for customers.
After the last setting and checking, you can finally click the Launch Website button to start selling with Shopify.
What are Shopify Payments?
Shopify Payments is a Shopify payment processor that integrates with your store. You can review and manage your payments online in the administration panel of the website.
You should fill out the Pay Period to accept cash from customers if you want to use this kind of payment processors.
Pay Period is the name of the stage when your customer makes the order and time when payment is received into your bank account. As a rule, if your customers make orders on Friday and weekend, you will see the common payment on Monday.
Generally, Shopify Payments allows access to money immediately after payments processing. Also, you can schedule data, when you want to get your money, for example, once a week or another period. To schedule your payment, you need to open Settings and Payment Providers, push the Manage button, then click Payout details. Don’t forget to save changes!
There are many helpful features in Shopify Payments, for instance, payout balances and fee tracking. Also, you can synchronize orders and payments to know how much you earn with particular orders.
Shopify Payments hasn’t a subscription transaction fee like a lot of other payment systems.
You should pay only the card rate for transactions.
How to use Shopify Shipping?
Shipping goods to your customers is one of the important moments that require your prompt solution.
Shopify has a special helpful function that automatically calculates the rates using as a source DHL and UPS, world-wide leaders of shipping. With the help of Shopify Shipping, you can process online orders and print shipping labels without the usage of different plugins.
The next advantage of Shopify Shipping is the existence of the arrangements with several big shipping carriers. This helps Shopify store owners to reduce the cost of customer service and save time for searching reliable shipping.
Click the Shipping option on the settings page to find shipping features. The more details you point out, the better it will be for your store. Write the weight and parameters of your goods, because the cost of shipping depends on that information.
As a rule, customers of the store can choose one of the shipping options. You can offer them different kinds of shipping or set up one of the variants by default, for example, the fastest or the cheapest way.
How can you use Shopify dropshipping?
You can start selling with Shopify in a lot of ways, even without the physical presence of the products, which means dropshipping.
In simple words, you list the supplier products on your website, attract the customers with the help of your marketing strategy and when you get the order, send it to the supplier. You can find a detailed guide to dropshipping and the analysis of its pros and cons in our previous post, Dropshipping for Beginners: Starting a Dropshipping Business with Shopify in 2019.
Shopify provides its users with a special application, Oberlo, which can link your dropshipping company products with your website. Also, Shopify offers you a lot of ways to use the credit card for dropshipping orders in the frames of your Shopify plan.
How to sell more even outside the Shopify store?
There are several ways how you can increase your sales without creating a Shopify store.
Shopify Buy Button
You can integrate the Shopify Buy Button into your external site, for example, Magneto, WordPress, Tumblr, or into your blog post. Such a solution helps you to increase sales and simplifies the product’s purchasing process for your customers. With this button, customers shouldn’t go to a separate page to complete a purchase.
The Shopify Buy Button is included in all Shopify plans, also you can use it separately, without buying a full plan for the website. The Shopify Buy Button is most frequently used by companies with the Shopify Lite plan.
You can customize your Buy Button and use it in your marketing mailing when you are creating checkout links.
The Buy Button looks like the shortcut that provides your customers access to your products and allows them to safely check the shopping cart. With the help of the Shopify admin account, you can track the orders that have been completed with this button.
There are several places where you can add the Shopify Buy Button on the website:
- Sidebar: you can add the Buy Button to the sidebar of your store to make it always visible and easily accessible.
- Landing page: it is a good choice for landing page dedicated to a separate unique offering.
- In your content: you can incorporate this button into the most popular and relevant posts on your blog.
Offline sales with Shopify
If you want to work with your clients offline, you can use the Shopify Point of Sale feature (POS).
This Shopify Lite feature can be helpful for those who sell at the markets, exhibitions, and pop-up stores. The Shopify Point of Sale allows you to accept credit card payments with PayPal, Square, and Stripe. In addition, you can customize tax requirements, apply discounts, process refunds, and take gift cards for partial payment.
If you have both website and physical places for sale, you can automatically synchronize your stock. Also, Shopify Lite gives you access to the plug-and-play card reader. With its card reader, you can accept online and offline payments.
Shopify gives its users a wide range of features for successful sales, from quick and simple store creation to the ability to sell offline and synchronize inventory. Shopify can help merchants with payment processing, shipping or dropshipping, making in this way a successful seller from a beginner.